Friday, May 25, 2012

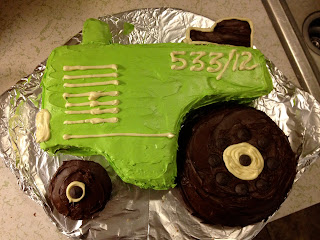
Tractor Cake ....


This year's birthday party theme was John Deere so it called for a TRACTOR CAKE. 

I surfed the Internet for cake inspiration and then settled on this basic concept for a cake. 


9X11 cake pan

I made a cup cake for the front tire and a small corning wear  dish was used for the back tire.

Place the tires on the cake and cut out the cake where the tires will fit.

Then use the left over cake to make the seat & exhaust.

Then ice it!

 What does the 533/ 12 stand for?   The kids birthday ages and the year!  Gavin turned 5 and Noah & Finley were 3.  The kids were all born a few days apart so my sister in law throws one party for all three kids. It's a blast!   Come back soon to see pics from the John Deere Themed Party!

Wednesday, May 23, 2012

Recovered the Dining Chairs

It was high time I recover the dining chairs.  We have only one dining set and it is a family heirloom and we love it ...being that it is the only dining set in the house we use it every day.  I had been pretty lucky about keeping the chair's upholstery in good repair until January when it seemed everything landed on the chairs and by landed I mean the chairs were;  peed on (not by me...), drawn on,  poured on, there was the great chocolate cake debacle and finally the stain of all stains homemade butternut squash soup (Made especially for Fin by our dear friend Kadra - we LOVE it!).   The soup is a most delicious and naturally highly pigmented substance which was the last stain to land on the old upholstery.

After a quick trip to Hancock Fabric I picked out a great material from the remnant pile.  It was $39.99 a yard but since it was a pattern from a few years ago I picked it up for $5.00  a yard and this time I bought extra in case another catastrophic spill warrants a recover.  The whole tally came to $16.00 and I have more than I need left over...so I'm thinking pillows for the outdoor area.

Tools of the trade include a screw driver, staple gun, staples and hammer.

It really is not rocket science to recover chairs...

The butternut stain for posterity.


First you remove the seats from the chairs with the screw driver ....

The honeymoon set. See the hearts in the chair backs & buffet doors?

Then you take out your material and lay it out on a flat surface and measure out your covers....


Material from Hancock Fabric remnant pile

I ONLY IRON when it's necessary - when sewing it's necessary.


Lay the chair back on the material and then fold the material over to cover the edges so you don't leave an edge to fray ... then use the trusty staple gun with "upholstery staples" ( they're longer) to attach the material to the back side of the chair.  I chose a material pattern that does not have an up or down which made it easy to cover.  You have to be more picky with stripes or florals that must have a visual accuracy....I won't even go there!

Fold over your edges before stapling.

Ta Daaa.  See it's that easy.


This time I bought Scotch Guard ... and once all the chairs were covered I took the seats outside and sprayed the snot out of them and let them dry and sprayed them again!


And here my friends is the final project.  


It's all about changing the material on a whim with a shoestring budget that way you don't sweat the dinner party spills.  Life is too short to obsess over stains I say!  Re purpose, redesign,  and be creative!


Thursday, May 17, 2012

Toddler Tales


Today's GEM from the Mouth of MY Toddler


Me:  
Finner there's apple sauce all over my chair!


Fin: 
The apple sauce did it all by itselfes.


I fold my face into my shoulder and walk briskly out of the room before I laugh.  
Seriously kid. NO ONE is gonna buy that story.


Wednesday, May 16, 2012

Back Yard Bok Bok


For years my husband Steve has been talking about getting a few chickens to raise for eggs and meat.  I'm totally on board the whole pets/eggs scenario, but, I don't eat meat and I really don't think I can get past our named backyard brood to eat our birds.  I digress, Steve raised chickens when he was a kid and so he has a grasp on the whole operation - this is entirely new to me, but, this Ship is on board 100 percent. Let the adventure begin!


April 10th - Fin's 3rd Birthday, Big Daddy P came home 
with eight day old chicks.   A gift for Finley.

Fin and honey Cat sat with the chicks for most of the day.

We have four pullets - We think they are Rhode Island Reds.
 And we have four black chicks that are NOT SEXED.
Time will tell if we have a rooster in the brood.
The chicks lived in this crate for about two weeks while we got the coop ready.
It was still pretty cool at night and so they needed the heat lamp.
Big Daddy P working on the coop.  It's built into the tree house.

Making the door for the coop.


Tadaaa the coop.

Once the chicks were about a month old we began to name them.  Some of the chicks are named after kids in Fin's pre-school class;  like Caroline and Sally.  Other friends of ours got to name the birds too.  We have Big George, Mario, Lyndsey, Poopie, Darla and ... I can't recall the last one's name  ahhhh - hit the comments and send us suggestions for new name?


Juvenile Birds - about three to four weeks old here.
 They're always sitting on one another.

Fin loves to handle the chicks.  They're getting used to us.
Bok! Bok! Bok!

Setting up the feed and water.
Fin is helping the chicken into her nesting house.

We let the chickens out to free range the back yard while we are at home.  At first I was afraid they'd take off  - you know like a dog would at the first chance to flee the fenced yard - but the chickens really are birds of a feather ... they flock together!  They graze and then head back to roost in the coop.  Usually all together.  They have established a pecking order and we've seen very few fights.   They sure are fun to watch!


Raised chickens?  Have any tips for us?